Here's how I made the dolly:
1) Buy the wheels. I choose these because they didn't really make noise when I tested them out at the store. They also swerve, which I though could be helpful for when I'm moving the dolly in a circular motion or turning it. I also bought an assortment of nuts and bolts.
(Forgot to take a picture but we had a small board to cut the wood on, you'll need that too, unless you want to damage your floors.)
3) Screw on the wheels.
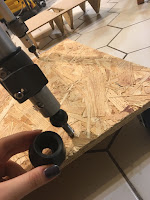
4) Now here's where it gets a little tricky. Strip off whatever's on the bottom of your tripod until it's just the screws. Then, drill a hole in your board for the screw to go into. Try to drill it from an angle since the legs of your tripod won't be standing straight up. Use a wrench to tighten it up. Do this for each leg. Now, your tripod is safe and secure.
I don't know if this is true for all tripods but mine comes with a little ball for support. I decided to keep it on but that's just optional. Also if u wanted to skip the hassle of drilling holes and everything I guess you could just try to tape or glue the tripod on the board but I opted for this since it was more stable.
5) This is also optional but I sanded down the wheels a little bit so they would make less noise.
Final product!!!

Depending on how the track is built I may have to switch my wheels but I'm not too worried about that. Also, in the midst of testing my dolly I realized that the zoom ring on my camera lens is stuck :( So, I'm getting it repaired at Camera Clinic this week. Hopefully I'll get it back within a week or so because I really don't want to have to borrow someone else's lens for filming. More news on this coming soon, 'til next time!


No comments:
Post a Comment